Needlework will always be fashionable.
Time does not affect him in any way.
Despite market relations, the soul is drawn to comfort and warmth. These feelings give hand-made crafts.
Most often, simple household items are used to create them. For example, women's tights.
They can give a second life and make a doll.
Doll Baba Yaga from tights do it yourself
Baba Yaga is a well-known fairy-tale character. It is good and evil. The master class is based on creating a cute and welcoming doll to decorate the kitchen interior. A toy can entertain children or guests.

To make a doll out of tights with your own hands you will need: nylon tights, a plastic bottle, synthetic filler, scissors, matching threads, needles, doll eyes, wire and pliers.
Stages of the manufacturing process of Baba Yaga:
1. First, for the doll is required to make a frame. To do this, take a regular plastic bottle. She cut the lower half with a bottom;

2. The resulting body part is wrapped with synthetic filler. At the neck and "at the waist" the fabric is tightly pulled by threads;
3. A capron sock from tights is put on the body;

4. Do-it-yourself doll face shaping. To do this, a small lump of synthetic filler is inserted into the visual area of the face. He models a nose;
5. The top of the bottle with a sock is tied. With the help of threads and needles, the nose is formed. Need to stretch the needle in a horizontal direction and pull the thread;

6. After this, you need to form the nostrils. The needle is pulled left and right on the nose in vertical positions;
7. The nose is given a sharper shape from the sides. The needle squeezes into the same previous holes, but the loops are tightened on the left side and on the right (on the left side and on the right);

8. The formation of cheeks and mouth. For this, lumps of synthetic filler are inserted under the nylon layer: a little on both sides of the nose, a little on the forehead and chin area;
9. The formation of the mouth. A needle is being pulled for this. The thread is pulled. The mouth is not stitched with small stitches;

10. Very carefully with the help of a needle and thread the upper lip is pulled;

11. A smile is attached. To do this, cheeks are pulled;

12. The chin is pulled back;

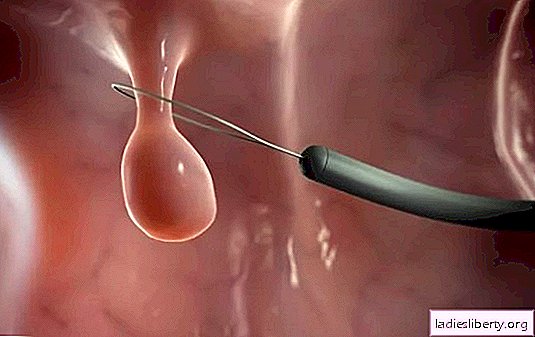
13. Toy eyes are glued. To do this, it is better to use a glue gun. In extreme cases - glue instant drying. But you need to be very careful with him. Errors are not allowed;
14. Above the eyes, tissue is drawn to form eyebrows;

15. Above the nose, the tissue is also slightly pulled;
16. At the final stage of making the face, the doll is made up. Blush is applied to the cheeks. Lips are painted on. It is recommended to use acrylic paints on the fabric. But before applying them, it is advisable to test them on a test piece of tissue;

17. Sewing of the crown. Excess tissue is hidden inside the neck and sutured;
18. Hair. In the store you can buy ready-made doll hair and sew to the head. As an alternative, it is possible to make strands for a doll from tights with your own hands. It is required to pick up woolen threads of the desired tone and weave a braid;

19. The stage of manufacturing pens. To do this, take the wire and cut into pieces. Two long segments and ten short ones are required. For long ones, both ends are bent into an oval. In short ones, they are twisted into a “snail”, but only from one end;
20. Each piece of wire is wrapped in a spiral tape made of synthetic filler. Tape 1 cm wide;
21. The formation of the hand. To do this, four short cuts are inserted into the ring of the large wire cut. Their length is adjustable according to the anatomical representation of the arm. Imaginary palm wrapped with a wider ribbon of synthetic filler;

22. Somewhere in the middle of the side, the fifth wire cut is inserted into the palm of the hand. A synthetic filler tape wraps completely around the arm;
23. On the handle of a doll from pantyhose with his own hands, a square-shaped nylon flap is put on. In the wrist, it is pulled by a temporary thread;
24. Each finger is pulled by a needle and stitched. It is recommended to flash twice;
25. The remaining edges of the flap are pulled to the intended shoulder and sutured. Excess tissue can be trimmed. A seam in the wrist area is stitched with a new one;

26. According to a similar pattern, the second hand is made in the mirror position;
27. The resulting pens are sewn into the appropriate places on the body of the doll from tights with their own hands;
28. Clothing. For the doll, it is recommended to sew a dress with some kind of national ornament. A shawl is put on and tied in an old style to one knot under the chin. Babu Yaga can be decorated with beads and ribbons. Ribbons will beautifully gird a toy.
That's all, it turned out a very beautiful designer doll, which will very organically fit into any kitchen design. Such a Baba Yaga can be given even as a talisman.